Blessings to you. Recently I overclocked my CPU and decided to write a post detailing the experience I gained during the process. My goal was to achieve a moderate and extremely stable overclock. I didn’t want to push the limits of my system too far, but I wanted to take advantage of my K series unlocked processor from Intel.
System Specifications
While the process I will outline is specific to my system, it may be useful if you have a similar system to mine or a Skylake chip on a different motherboard. If your system is much different, this post may still be relevant in improving your understanding of the overclocking process in general. Before we begin, my system is comprised of the following components:
- Intel Core i7 6700K Skylake
- ASUS ROG Maximus VIII Hero Motherboard
- G.SKILL Ripjaws V Series
- MSI GeForce GTX 1070
Download Required Software
During my overclocking process, I ran into some issues that were solved by using a fresh installation of Windows 10. I would recommend starting from a fresh installation of Windows if you would like to minimize your chances of running into any problems. The next thing you will want to do is to download your some system monitoring, benchmarking, and stress testing software. I used to following programs:
- ROG CPU-Z for system monitoring
- 3DMark for performance benchmarking
- ROG Realbench for stress testing
- AIDA64 for stress testing
BIOS OMG
OMG it’s time to dive into the BIOS! The modern UEFI BIOS is actually a very pleasant experience. Overclocking your system is a very much guess and check process. You want to modify only a few settings at a time, run tests, and then repeat.
Dial-In Your Multiplier
Before you start fiddling with settings in your BIOS it may be a good idea to load its optimized defaults or clear your CMOS. The first step is to set a goal frequency at which you want your Skylake CPU to run. A good starting point if you are unsure is 4500 MHz. I decided on a solid 4600 MHz as my target. This frequency is a product of the base clock, initially set to 100, and the CPU multiplier. The capabilities of your CPU may differ, but the 6700K should have no problems getting to 4.6 GHz. Once you have determined your CPU multiplier you will want to set a manual voltage for your processor to run at. It is a good idea to start low, see if your system crashes, and then gradually increase it until you reach a voltage at which it is stable. I would not recommend going above 1.35 volts. The following is the process that worked for me:
- Load optimized defaults
- Set Ai Overclock Tuner to Manual
- Disable ASUS MultiCore Enhancement
- Set CPU Core Ratio to Sync All Cores
- Set 1-Core Ratio Limit to 46
- Set CPU Core/Cache Voltage to Manual Mode
- Set the CPU Core Voltage Override to 1.31
Cache Changes
While it is possible to overclock your CPU cache, I chose to set it to more reasonable amounts to guarantee performance and stability. The following is what I changed next:
- Set CPU Core/Cache Current Limit Max to 255
- Set Min CPU Cache Ratio to 8
- Set Max CPU Cache Ratio to 41
- Set CPU Load-line Calibration to Level 6
- Disable VRM Spread Spectrum
Speed Up Your RAM
If you have installed high end memory into your system, chances are it is not running at its rated speed. In order to achieve this you must instruct your motherboard to use the RAM’s extreme memory profile. This profile is essentially a group of settings optimized for your memory’s performance. For high speed memory such as my 3.2 GHz G.SKILL sticks, it will also be necessary to fiddle with your VCCIO and system agent voltages. The following is the process that worked for me:
- Change Ai Overclock Tuner to XMP
- Set the CPU VCCIO Voltage to 1.2
- Set the CPU System Agent Voltage to 1.2
Finishing Touches
Once you have reached a stable overclock, there are a few finishing touches to make in the BIOS. The system should not be stress tested after these finishing touches are made. This is because many stress testing programs may push the CPU voltage higher than necessary whilst it is running in adaptive mode. The following are the changes I made after I reached a stable overclock.
- Enable Intel SpeedStep
- Change CPU Core/Cache Voltage to Adaptive Mode
- Set Additional Turbo Mode CPU Core Voltage to 1.31
Stress Testing Results
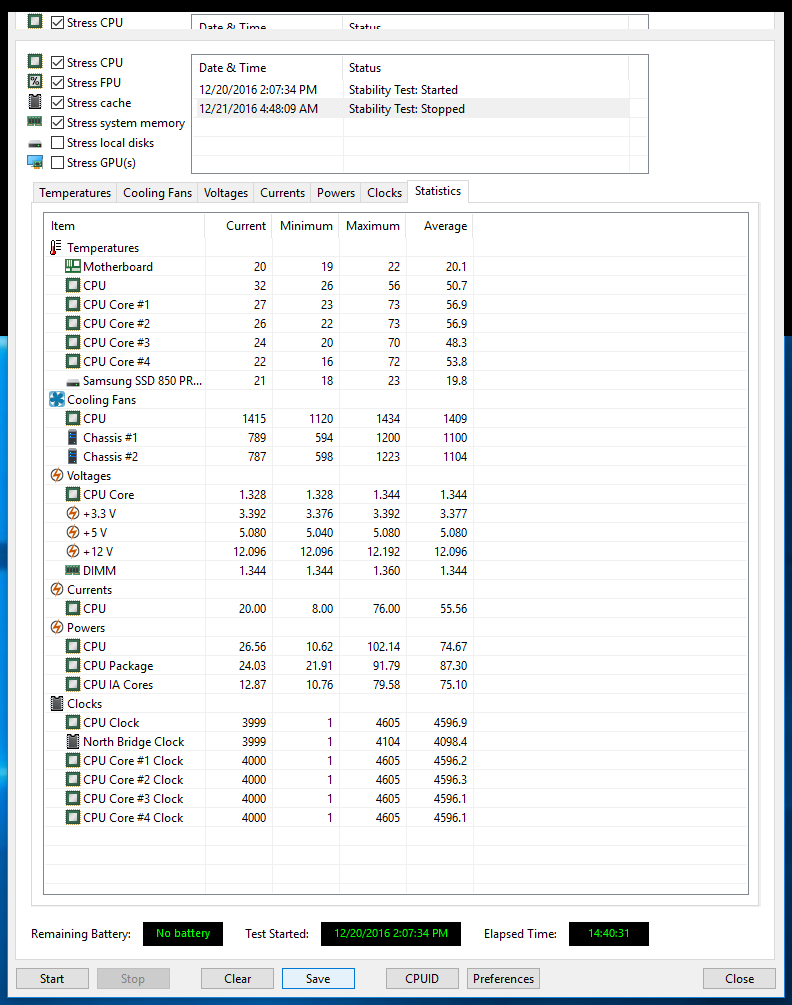
Throughout the process of changes settings in the BIOS, I would boot the system and run Realbench for around 15 minutes. This would give me confidence that the system had basic stability since it was able to both boot and pass a short stress test. A stable system should be able to run Realbench for 4 hours and AIDA64 for 12 hours. It is a good idea to utilize multiple stress testing programs, as they stress different parts of the CPU and memory in different ways.

Benchmarking Results
My 3DMark benchmarking results can be viewed here:

